
Web3 Smart Contracts Unit Testing
I shared how I unit test my Web3 smart contracts by building a simple smart contract and unit testing it.

Due to many records of smart contract bridges, hacking and thefts recorded since the inception of web3 and blockchain. It's paramount to always test your smart contracts before deploying them to production.
Therefore, the closest way to testing your smart contract is by using the software testing approach. Additionally, it's also very important to always test your software before you deploy it to production for your customers. Also, software testing is vital even in blockchain development and the Web3 industry.
In this guide, I am going to share with you how I unit tests my Web3 smart contracts. You will learn about unit testing. I will demonstrate how to unit test your smart contract by building a simple smart contract and unit testing it.
What is software testing
Software testing is a very important aspect of software development, it ensures that the software under test meets the intended requirement and is free of errors, and bugs, and is defect-free.
Software under development must undergo rigorous software testing before it is deployed to production to avoid security issues that might cost monetary value.
Software testing is categorized into different types and categorizing but I will only discuss how to use unit testing to test your smart contract. You can get the list of all software testing types here.
What is unit testing
The Unit Test is a special software testing technique carried out by developers to test every single unit and component of the software under test. It is the smallest form of software testing because it checks every small unit of a larger software product.
Unit testing is very vital because it helps developers to catch errors and defects right from the development stages and that's exactly what we are going to use to test our smart contract against any errors.
Creating a smart contract
I will start creating a smart contract and integrating mocha as the testing library of my choice. Before we start, I will start by installing all the libraries and setting up my working environment to create my smart contract.
Setting up the project
First, I created a folder that will represent my project and installed the following libraries after initialing NPM and Node.js.
Installing packages
Next, I added the following libraries to my package.js with this command.
npm install web3 assert mocha ganache-cli solc
Mocha
Mocha is my testing library of choice, there are numerous available testing libraries to choose from.
Web3.js
Web3.js is a collection of libraries that allow you to interact with a local or remote Ethereum node using HTTP, IPC or WebSocket.
Assert
A run-time type assertion library for JavaScript
Ganache-cli
Ganache CLI uses ethereumjs to simulate full client behavior and make developing Ethereum applications faster, easier, and safer.
Solc
Solc is JavaScript binding for the Solidity compiler
Creating our smart contract
Create a folder inside your root file called contracts/inbox.sol and add the following codes.
// SPDX-License-Identifier: MIT

pragma solidity ^0.8.9;

contract Inbox {
    string public message;

    constructor(string memory initialMessage) {
        message = initialMessage;
    }

    function setMessage(string memory newMessage) public {
        message = newMessage;
    }
}
This is a simple smart contract that stores a message when the instance of the contract is created and also provides the setMessage method to update the message.
Next, let's move to test this simple smart contract to make sure it working properly.
Unit testing your smart contract
This will be a two-step process, compiling the smart contract and lastly, testing the smart contract.
Compiling your Smart Contract
Before we test our smart contract, I will set up a compile script to compile our smart contract and produce the ABI and Bytecode.
const fs = require('fs');
const path = require('path');
const solc = require('solc');

const inboxPath = path.resolve(__dirname, 'contracts', 'Inbox.sol');
const source = fs.readFileSync(inboxPath, 'utf-8');

const input = {
  language: 'Solidity',
  sources: {
    'Inbox.sol': {
      content: source,
    },
  },
  settings: {
    outputSelection: {
      '*': {
        '*': ['*'],
      },
    },
  },
};

module.exports = JSON.parse(solc.compile(JSON.stringify(input))).contracts[
  'Inbox.sol'
].Inbox;
ABI and Bytecode are smart contract terms and I will drop another article explaining them in detail. However, you can get an overview from this guide.
Furthermore, the code snippet above, simply locates where our contracts are stored using the fs and path libraries from Node.js
Next, I use the smart contract compiler solc to compile the smart contracts and return the compiled ABI and Bytecodes.
Testing your Smart Contract
To test our smart contract, I will create a file inside the root directory as shown tests/inbox.test.js and paste into the following codes.
const assert = require('assert');
const ganache = require('ganache-cli');
const Web3 = require('web3');
const web3 = new Web3(ganache.provider());
const { abi, evm } = require('../compile');

let accounts;
let inbox;

beforeEach(async () => {
  accounts = await web3.eth.getAccounts();

  inbox = await new web3.eth.Contract(abi)
    .deploy({ data: evm.bytecode.object, arguments: ['Hi there!'] })
    .send({ from: accounts[0], gas: '1000000' });
});

describe('Inbox', () => {
  it('deploys a contract', () => {
    assert.ok(inbox.options.address);
  });

  it('has a default message', async () => {
    const message = await inbox.methods.message().call();
    assert.equal(message, 'Hi there!');
  });

  it('can change message', async () => {
    await inbox.methods.setMessage('new message').send({ from: accounts[0] });
    const message = await inbox.methods.message().call();
    assert.equal(message, 'new message');
  });
});
Code Walkthrough
Let's walk through the code snippet for a clear view.
Step 1: Requiring packages
First, we require the ganache-cli, assert, and web3 packages, and next, we initialize the variables that will be used throughout the test inside the beforeEach script.
const assert = require('assert');
const ganache = require('ganache-cli');
const Web3 = require('web3');
const web3 = new Web3(ganache.provider());
const { abi, evm } = require('../compile');

let accounts;
let inbox;

beforeEach(async () => {
  accounts = await web3.eth.getAccounts();

  inbox = await new web3.eth.Contract(abi)
    .deploy({ data: evm.bytecode.object, arguments: ['Hi there!'] })
    .send({ from: accounts[0], gas: '1000000' });
});

...
Step 2: Create a Describe block
A Describe block contains a collection of related test cases. We use the describe block to group all our test cases together since they are related.
...

describe('Inbox', () => {
  it('deploys a contract', () => {
    assert.ok(inbox.options.address);
  });

...
Step 3: Adding Test Cases
Lastly, we included all the other test cases inside the describe block, each test case tests a particular behavior or implementation of a feature.
First, I test to make sure the initial message is not empty and it's equal to the initial message added when I created the instance of the smart contract.
Secondly, I test to make sure the setMessage method is working and it's changing the message property accordingly.
...

it('has a default message', async () => {
    const message = await inbox.methods.message().call();
    assert.equal(message, 'Hi there!');
  });

  it('can change message', async () => {
    await inbox.methods.setMessage('new message').send({ from: accounts[0] });
    const message = await inbox.methods.message().call();
    assert.equal(message, 'new message');
  });

...
Lastly, I will run the test to make sure it passes successfully.
Running the test
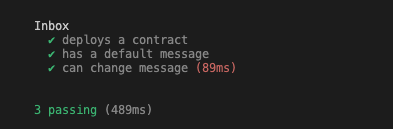
To run your test, type in the following command into your root terminal. bash npm run test
After successfully performing running the test, You should be greeted with green passes for your test, like the screenshot below:
Summary
Unit testing cannot capture all the possible errors and hacking tricks but it will significantly reduce the risk of deploying a buggy application to production while allowing users to interact with it using real monetary value.
Therefore, implementing and maintaining a development culture of unit testing your smart contracts during development should be highly considered and integrated into your team.
In addition, I have explored how to start unit testing your smart contracts, I also show an example of unit testing a simple smart contract.
Let me know if the article was helpful. Cheers.